


Spring has finally arrived in Canada and though the fact that the weather is getting warmer is a relief, it is a terrifying prospect to the homeowners. Melted snow, more rain and moist ground form the ideal storm of basement flooding. Your sump pump repairs might be the difference between a dry basement and thousands of dollars in water damage. This is the reason why it is crucial to initiate a detailed maintenance program in March.
Not all Canadians who have a sump pump in their homes consider it until it breaks. By then, it’s too late. The leaking pump in spring thaw may enable seeping of water into your basement, ruining your completed areas and weakening your foundation. The good news? It is a basic sump pump repair checklist that only takes a few hours and will help to save you at the time of disaster.
Why Spring Matters for Your Sump Pump
The sump pump basement system is not treated like any other season during winter. Problems can be caused by frozen discharge lines, melt water mineral deposition, and inactivity over some periods of time. In spring and the volume of water doubles in a short time, you are going to expect your pump to work perfectly. During the spring thaw season, the pressure on your system increases exponentially and it is this reason that March preparation is indispensable.
The spring thaw is also intense and predictable in Ontario and other provinces in Canada. Soil is still in part frozen meaning that the water moves on the surface rather than being absorbed. This creates enormous strain to your foundation, and your sump system. A pump that was not used for several months now has to run all over April and May.
Key Spring Challenges for Canadian Homeowners:
- Frozen discharge lines blocking water flow
- Sudden increase in groundwater pressure around foundation
- Extended pump operation causing motor stress
- Mineral deposits clogging intake screens
- Failed float switches from winter debris accumulation
- Power outages during spring storms
A quality sump pump has an average life of 7 -10 years. In the case of older people, spring is the best season to plan on sump pump replacement. In case it is of more recent date, refer to this checklist taking into consideration the fact that it is not yet prepared to withstand the wet season that is coming. Preventive maintenance will save you the call to an emergency plumber when it is flooding in the worst weather conditions.
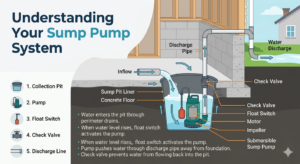
Understanding Your Sump Pump System
You should know what you are dealing with before you begin the repairs. The majority of the Canadian houses have a submersible or pedestal sump pump installation. Submersible pumps are placed in the pit, which is entirely covered with water. Pedestal models have the motor (above water) and an intake at the bottom.
Types of Sump Pumps Available:
- Submersible pumps (most common in residential applications)
- Pedestal pumps (require more headspace but easier to service)
- Battery backup pumps (emergency power during outages)
- Water operated pumps (uses municipal water pressure as backup)
- Combination systems (primary pump plus multiple backups)
One of the smartest investments that a Canadian homeowner will make is one that comes in the form of a backup sump pump. The second pump occurs automatically in case your main pump has stopped working due to a big storm. This has an added advantage of redundancy: together with a backup battery for a sump pump, it can protect your home even during a power outage.
Why Backup Systems Matter:
- Primary pump failure can happen suddenly without warning
- Spring storms often coincide with power outages
- Backup systems activate automatically without manual intervention
- Battery backups provide 4 to 8 hours of continuous operation
- Water operated backups function as long as municipal water pressure exists
- Insurance companies offer discounts for homes with backup systems
- Prevents thousands in basement flooding damage
Your sump pit installation needs to be positioned at the bottom of your basement. This basin holds the pump which gathers the ground water during its filtering through soil surrounding your foundation. The sump pump piping removes this water off of your home in a discharging line that empties at least 4-6 feet of your foundation.
Step 1: Inspect Your Power Source and Electrical Setup
Make sure that your sump pump repairs begin with electricity before doing anything. Your pump is to be installed in a special circuit of a Ground Fault Circuit Interrupter (GFCI) outlet, but not in an ordinary outlet. Move the GFCI outlet test button. It should click and cut power. Press reset to restore it. In case this does not occur, the outlet must be replaced.
Electrical Safety Inspection Checklist:
- Confirm pump plugs into GFCI outlet (not standard outlet)
- Test GFCI outlet by pressing test button (should cut power)
- Verify reset button restores power properly
- Inspect power cord for fraying, cracks, or burn marks
- Check that plug sits fully and firmly in the outlet
- Test outlet with another device to confirm steady power supply
- Verify breaker switch is in on position at electrical panel
- Check for scorching marks around outlet or plug connections
Inspect the power cord and look at it to see whether it is fraying, has cracks or burn marks. Ensure that the plug is entirely inserted in the outlet. Exceptional failures of pumps, which occur at a time when they are most needed like in spring storms, are often the result of loose connections. Check your outlet by plugging a different gadget that can be used to check its continual power.
Check your electric panel and make sure that you have the breaker of your sump pump on. Most house owners find out during a storm that the breaker has tripped off, and the pump is useless. In case you have a backup battery for a sump pump, then press the test button or feign a power cut to test whether the pump will automatically start.
Step 2: Test Float Switch and Activation
The most popular point of failure is the float switch. This is a basic mechanism that bobbles up when water is increased and activates the pump. A bugged or out of position float implies that your pump will never stop (burning the motor) or will not start all.
Float Switch Testing Procedure:
- Gently pour water into the sump pit slowly and carefully
- Listen and watch for pump to engage as water level rises
- Note the water level at which activation occurs
- Pump should start within seconds of float reaching activation point
- Listen for smooth motor startup without grinding or humming
- Confirm pump shuts off when water level drops back down
- Check that float arm moves freely in all directions
- Verify no debris or sediment blocks float movement
Water can be added to the sump pit gently till the float arm goes up. Listen for the pump to engage. It must not start up slowly or with strange sounds. When the pump does not rotate and there is a humming sound, the motor might be loaded or the float might be caught.
Ensure that the float arm swings freely without striking the walls of the pits, the pump itself and debris. The float is unable to rise in the event that the pump is seated in an un-straight or inclined mode. Ensure that your pump is standing on solid ground in the pit.
Step 3: Clean the Sump Pit and Remove Debris
The debris of spring is a mute murderer. During winter, leaves, dirt, twigs and gravel fill up in your sump pit, particularly in the basement of buildings where the design of sump pit installations is old. Your pump may get stuck in this rubbish or you may even have intake screens blocked.
Deep Cleaning Your Sump Pit:
- Turn off power to your pump at the breaker switch
- Use wet vacuum to remove standing water from pit
- Scoop out visible debris using bucket or small shovel
- Remove leaves, twigs, dirt, gravel, and mineral deposits
- Clean intake screen with stiff wire brush or old toothbrush
- Flush pit with clean water to remove fine sediment
- Inspect pit walls for cracks, rust, or structural damage
- Check pit perforations to ensure water can enter freely
Switch off your power-supply to your pump at the breaker. Vacuum or use a bucket to scoop out all debris on the bottom of the pit. Eliminate mineral deposits or rust flakes which can have developed. Check the intake screen of the pump to make sure it is not partially blocked and remove it using a wire brush as required.
Look to determine the presence of sediment. The deposits may impede water flow into the pump in places where the water is hard or that the water has a lot of minerals. The professional sump pump service is done once a year with flushing of such deposits, but you can perform some simple cleaning in spring.
Step 4: Inspect Discharge Pipe and Piping
The sump pump piping that is used in your sump pump is also as important as the pump itself. Water is washed off your foundation in the discharge line. Even a working pump will never save your home in case it is clogged, frozen, or not placed.
Complete Discharge Line Inspection:
- Locate discharge pipe exit point outside your home
- Check that discharge opening is clear and unobstructed
- Verify water flows at least 4 to 6 feet away from foundation (10 feet ideal)
- Inspect piping for cracks, breaks, or corrosion
- Check all pipe joints for separation or loose connections
- Test flapper valve to confirm it opens and closes properly
- Ensure piping slopes downward to promote gravity drainage
- Look for frozen sections that may have ice blockage
- Confirm piping is securely fastened and doesn’t sag
Ensure the discharge pipe is free flowing. Frozen lines are frequent in mornings of the spring in Canada when even the nights drop below freezing. Water that is retained in the discharge line overnight may freeze and block the whole system. You may not even see until the pump attempts to operate and the water starts to fill up into the pit and make it overflow.
How Frozen Discharge Lines Form:
At night in Canada when it is cold, the discharge line containing the water becomes frozen. This blockage of ice does not allow the pump to expel the water even when the motor is running. There is an accumulation of water in the pump cavity which is incapable of escaping. The motor then overheats due to continuous working against the blockage. During the morning your pump can be burnt or broken.
Are the pipes tied and with the correct angle? Flexible piping may burst when flowing heavily. Downward slope piping aids the drainage of the water through gravity. In case you notice cracks, corrosion or separation at joints, make sure that they are cared about prior to the arrival of spring rains.
Step 5: Test Your Sump Pump Function
Now comes the moment of truth. Take a bucket of water and pour it into the sump pit slowly and carefully watching and listening. In a few seconds the pump should be running. After activation, it is supposed to pump the water out effectively with the discharge pipe.
Complete Functionality Test Process:
- Fill bucket with clean water from tap
- Slowly pour water into sump pit and monitor float rise
- Time how long before pump activates (should be seconds, not minutes)
- Listen for smooth motor startup without grinding noises
- Watch water level drop to confirm pump is moving water
- Go outside and verify water exits discharge pipe
- Confirm water flows far enough from foundation
- Check that discharge line has adequate pressure and flow
- Wait for pit to empty completely
- Verify pump shuts off automatically once pit empties
Watch the water level drop. It must be reduced gradually without delay. When the pump is straining or pumping low-rate water, then it might be losing its ability to pump through age or internal damage. An old pump may still be operational, but unable to work during a spring thaw when volumes of water are high.
Step 6: Examine Your Backup Power Options
Spring storms tend to come along with power outages. You can die during a storm when using a backup battery for a sump pump, and your pump is useless. That is why March is the most appropriate month to check your backup power supply.
Backup Power Testing Checklist:
- Check that backup battery system is plugged in and charging
- Test battery indicator light or display (should show fully charged)
- Unplug primary pump from GFCI outlet
- Flip electrical breaker to the off position
- Verify backup system activates automatically
- Pour water into pit to confirm backup pump runs
- Time how long backup operates before battery depletes
- Check for any error messages or warning indicators
- Inspect battery connections for corrosion or loose terminals
- Review battery manufacturer specifications for age
In case you have a battery backup system, pretend there is a power outage by disconnection of your main pump on its outlet. Flip the breaker off. Your back-up must work automatically. Otherwise, it can be the dead battery, loose connections or the system can be out of order.
Step 7: Consider a Backup Sump Pump
It is always advisable to have two pumps. A backup sump pump is located next to the main pump. Should the primary fail the backup automatically comes on when the water increases. This is the standard of gold in protecting basement floods.
Benefits of a Dual Pump System:
- Automatic activation if primary pump fails
- Redundancy that provides maximum protection
- Two pumps sharing workload extends each pump’s lifespan
- Insurance discounts often available for dual pump systems
- Peace of mind during spring thaw knowing backup is ready
- Either pump can handle the job if the other malfunctions
- Dramatically reduces flooding risk compared to single pump
Changing a sump pump with one that has a backup sump pump would be more expensive, but it will save you the hassle of having your basement flood. Most insurance companies in Canada provide a discount on homes which have backup pumps since they lower claims by a significant margin.
When Should You Call a Professional Plumber?
Some problems cannot be repaired without the help of an expert because the basic sump pump maintenance such as cleaning or testing can be performed independently.
Call a professional same day plumber or 24 hour plumber if:
- Your sump pump stops working during heavy rain
- Water is rising in your basement
- You notice electrical issues or burning smells
- The system keeps failing after repairs
- You need new sump pump installation or replacement
Acting quickly helps prevent flooding and costly damage.This is where Pioneer Plumbers Inc comes in. They are a reputable plumber company in the service of the towns of Guelph, Richmond Hill, Newmarket, Vaughan, and Aurora offering quick and efficient sump pump services to households and commercial premises.
Whether you need an urgent sump pump repair near me or complete system upgrades and plumbing leak repair, their skilled staff will make sure your system is ready to withstand the spring throughout Canada.
Conclusion
The most crucial moment is spring when you should make sure that your sump pump is in good condition. Due to snowmelt and excessive rains throughout Canada, this may cause a minor problem that can soon result in flooding a basement and end up being rather expensive.
Through this checklist, keeping up with sump pump maintenance, and eliminating issues early, by sump pump repairs in time, you can ensure that your home is safe all the season long.
When your system begins to indicate problems or requires upgrades, then do not delay to call a professional plumber so as to make sure that when the next storm strikes, then everything is in place.